FAQ 1 페이지

본문 바로가기

기술지원

FAQ

FAQ 1 페이지 목록

  1. Q ProShake 2.0 Installation

    A

    If you ordered a USB license key:

    Once you receive your USB license key, please download and install ProShake 2.0 - Educational Versionif you haven’t already. Please note that the educational and professional versions share the same setup files. When the USB key is attached to the computer, ProShake 2.0 will recognize and will enable the professional version. When the key is not available, it will function as the educational version.

    If you would like to receive a temporary machine license until you receive the USB license key, please follow the steps below:

    1. Download and install ProShake 2.0 - Educational Versionif you haven’t already. Please note that the educational and professional versions share the same setup files.
    2. Please run ProShake 2.0 and select “Tools-->License-->Register” menu item
    3. It will display a series of dialog boxes to register your copy of ProShake 2.0.
      1. Click OK on the first dialog box.
      2. Please fill out the registration information in the next dialog box and click the "OK" button. Please use the company information and e-mail address under which ProShake 2.0 was purchased.
      3. Please click on "Register" button on the next dialog box. An e-mail message will open within your e-mail program with the details needed for us to generate and send you a license key. If you don’t have default e-mail program setup, please copy and paste the registration ID displayed in an e-mail and e-mail it to us at proshake@proshake.com. You can now click on the "Exit" button on the dialog box to exit the program. We will e-mail you the license key within one business day, often the same day, of receiving your e-mail with the registration ID.
      4. Once you have received the license key, please start ProShake 2.0 and follow the steps in 3 (the information you provided will be preloaded) and when you reach step 3.c above, enter the license key in the "License Key" text box and click the "OK" button to begin using ProShake 2.0.

    If you ordered a Machine license key:

    Please follow the steps below to receive your machine license:

    1. Download and install ProShake 2.0 - Educational Versionif you haven’t already. Please note that the educational and professional versions share the same setup files.
    2. Please run ProShake 2.0 and select “Tools-->License-->Register” menu item
    3. It will display a series of dialog boxes to register your copy of ProShake 2.0.
      1. Click OK on the first dialog box.
      2. Please fill out the registration information in the next dialog box and click the "OK" button. Please use the company information and e-mail address under which ProShake 2.0 was purchased.
      3. Please click on "Register" button on the next dialog box. An e-mail message will open within your e-mail program with the details needed for us to generate and send you a license key. If you don’t have default e-mail program setup, please copy and paste the registration ID displayed in an e-mail and e-mail it to us at proshake@proshake.com. You can now click on the "Exit" button on the dialog box to exit the program. We will e-mail you the license key within one business day, often the same day, of receiving your e-mail with the registration ID.
      4. Once you have received the license key, please start ProShake 2.0 and follow the steps in 3 (the information you provided will be preloaded) and when you reach step 3.c above, enter the license key in the "License Key" text box and click the "OK" button to begin using ProShake 2.0.
  2. Q Error message – Number of Allowed Activations Exceeded

    A

    모든 IDEA StatiCa 라이선스는 가능한 활성 사용량이 제한되어 있습니다. 이 오류 메시지가 표시되면 사용 가능한 활성화(좌석)가 모두 소진되었음을 의미합니다.

    여러 장치에서 라이선스에 로그인할 수도 있지만 IDEA StatiCa의 각 인스턴스는 선택한 제품에 따라 라이선스의 시트를 사용합니다.

    라이선스 시스템을 사용하면 라이선스의 현재 사용량을 쉽게 확인하여 라이선스를 사용하는 사람을 식별하고 로그아웃하고 라이선스를 해제하도록 요청할 수 있습니다. 

    IDEA StatiCa V21 또는 V20을 사용 중이고 사용량이 0인 경우 컴퓨터의 캐시 오류일 수 있습니다. C:\Users\%USERNAME%\AppData\Roaming\IDEA_RS 에 있는 Shafer 폴더를 삭제하면 이 문제를 빠르게 해결할 수 있습니다. 

    폴더를 삭제하면 다시 로그인을 시도할 수 있습니다. 


    Support Center 

  3. Q IDEA StatiCa 라이선스 서버 네트워크 접속이 안되는 경우 해결 방법

    A

    IDEA StatiCa version 22.0 connects to:

    Older versions(21, 20) of IDEA StatiCa connect only to:


    보안관련 네트워크 관리자는 프록시 또는 방화벽 설정에 따라 이 옵션을 외부 인터넷 접속 허용 목록에 추가해야 할 수 있습니다. 


  4. Q 라이선스 유지 체크 간격 조정 (1-1000 hours)

    A

    사용자 포털에서 라이선스 검사 간격을 변경할 수 있습니다. 포털에 들어가려면 로그인 아이콘을 클릭하고 IDEA StatiCa 자격 증명으로 로그인한 다음 License & Users 탭으로 이동합니다. 


    관리자 권한이 있는 모든 사용자는 1-1000시간으로 설정할 수 있는 라이선스 확인 시간을 변경할 수 있습니다. 

    이는 전체 라이선스에 영향을 미치므로 각 사용자에 대해 별도로 설정할 수 없습니다. 

    이 숫자는 인터넷에서 오프라인으로 전환된 후 컴퓨터에서 라이선스가 작동하는 시간을 나타냅니다.

    사용자가 컴퓨터에서 IDEA StatiCa를 실행하면 설정된 라이선스 사용 간격 동안 라이선스 활성화가 라이선스 풀에서 사용되므로, 

    다른 사용자가 사용할 수 없습니다. 

    설정된 간격이 종료되면 사용자가 IDEA StatiCa를 계속 사용하지 않는 한, 사용된 라이선스 활성화는 계정 풀로 자동으로 반환 됩니다.

    온라인과 오프라인의 이러한 조합은 다음과 같은 다양한 시나리오를 허용합니다.
     

    • 공유 라이센스 – 라이선스가 PC에 고정되지 않도록 라이선스 체크 간격을 1시간으로 설정합니다. 더 이상 사용되지 않으면 IDEA StatiCa 종료 후 1시간 후에 서버로 반환 됩니다.
    • 출장 – 출장 시 인터넷 연결 없이 라이선스를 활성화해야 하는 200시간을 설정합니다.


    확인 간격의 변경은 현재 실행 중인 세션이 아닌 다음 IDEA StatiCa 실행에만 영향을 줍니다.


  5. Q 라이선스 사용자 강제 종료 및 사용중인 사용자 확인 방법

    A

    모든 IDEA StatiCa 라이선스는 회사 관리자의 설정(기본적으로 72시간)에 따라 자동으로 반환 됩니다. 

    그리고 모든 사용자는 https://my.ideastatica.com에서 누가 어떤 제품을 사용하고 있는지 확인할 수 있습니다. (로그인 필요)


    그러나, 알 수 없는 어떤 원인으로 IDEA StatiCa 라이선스가 PC에 고정되어 라이선스 시스템에 접속할 수 없는 경우, 다음의 명령을 사용하여 사용한 라이선스 시트를 직접 로그아웃할 수 있습니다. 

    예) "C:\Program Files\IDEA StaticCa\StatiCa 20.0\License.exe"에 있는 "License.exe"를 클릭하여 "Sign out" 버튼을 선택하면 라이선스가 반환 됩니다. 


    그러면 모든 시트가 라이선스 풀로 즉시 반환되고 나머지 조직에서 사용할 수 있습니다. 이 작업을 수행하려면 인터넷에 연결되어 있어야 합니다. 

    라이선스를 사용중인 사용자 리스트를 확인 하는 방법은 첨부 링크에서 확인 하실 수 있습니다

    How do I see real-time usage of license products?


  6. Q Dlubal R-FEM 무료 학생용 버전 신청 방법

    A

    We offer students the opportunity to use our programs free of charge for non‑commercial purposes while enrolled in a university or college. Join the many students who have already benefited from this unique opportunity.

    • Submit your current proof of enrollment and we will provide you with a full version of our software (including all add-on modules except RWIND Simulation and SHAPE-MASSIVE) valid for 1 year.
    • At the end of your license expiration, you can extend the license for an additional year by submitting an updated proof of enrollment at your college or university.
    • It is not permitted to use the software for commercial purposes or to provide the license to third parties.
    • The student version is a full version without limitations or restrictions. You will also have access to our tech support via email at no additional cost.
  7. Q Strand7 Student Version 신청 방법

    A

    Strand7 Student Version 신청 방법은 첨부된 신청서를 참고하시기 바랍니다. (월AU$10)


    frame.jpgplanestress.jpgplatemodes.jpg
    rail.jpgcar.jpgbridge.jpg
    disk.jpgbuilding.jpgshed.jpg

    As an engineering student, you are learning the skills you will need for a rewarding career in engineering - this is where Strand7 can help you:

    The Strand7 Student Version is available for students enrolled in an approved university course. As a student, you get access to all Strand7 modules (except for the API), with no limits on model size. The software may only be used for your course work. Access costs AU$10 per month.


    To request access, please complete the form and return it to student@strand7.com.


    첨부파일

  8. Q IDEA StatiCa 학생용 무료 라이선스 신청 방법

    A

    Every student or teacher can apply for a FREE educational license of IDEA StatiCa for 12 months. This license is for learning and working on various student assignments and thesis. The license has watermarks, limited report, and projects created in it are not compatible with commercial licenses. This license is neither for universities nor can be used commercially. Universities are required to purchase the Academic license.


    무료 라이선스 신청은 아래 링크 또는 [www.ideastatica.com/students-universities] 에서 신청하실 수 있습니다.


    REQUEST FREE EDUCATIONAL LICENSE FOR INDIVIDUALS 


  9. Q Strand7 Generating a New Key Code

    A

    Strand7 requires a security key code to run. A key code must be entered for new installations and when new options are purchased for existing installations. There are some special cases where a new installation will not require a new key code, as discussed in ST7-1.60.20.5 Network Installation Configuration. Right-click on the Strand7 icon and select Run As Administrator. For Strand7 R2.4.4 and prior, a dialog will appear stating that you need to enter a new key. Click Yes. ... 


  10. Q How do the BIM links work for IDEA StatiCa Member?

    A

    IDEA StatiCa BIM links were developed to speed up the analysis and design process by importing data models from FEA  programs. BIM links to the most widespread FEA programs are being developed and maintained by IDEA StatiCa and are a part of the installation setup. For any other FEA program, the BIM link can be created using the public API interface IDEA Open Model (IOM).

    After installation, IDEA StatiCa automatically integrates the BIM links to your FEA programs. For later installed programs, BIM links can be activated in the BIM link installer.

    The data transfer from FEA projects to IDEA StatiCa is realized via the Code-check manager. The code-check manager is an application to import and manage structural joints and connections or members that you want to analyze and code-check in IDEA StatiCa. It also allows merging imported models from CAD and FEA projects into one, synchronizing the imported models after you update the source FEA or CAD project and more.


    Support center 

  11. Q How do the BIM links work for IDEA StatiCa Concrete and Pres…

    A
    IDEA StatiCa Concrete and Prestressing products are linked with a lot of FEA Softwares to provide a smooth and effective workflow for structural engineers. Using these BIM links the engineer can quickly import a critical member into IDEA StatiCa and code-check it there.

    IDEA StatiCa BIM links were developed to speed up the analysis and design process by importing data models from FEA  programs. BIM links to the most widespread FEA programs are being developed and maintained by IDEA StatiCa and are a part of the installation setup. For any other FEA program, the BIM link can be created using the public API interface IDEA Open Model (IOM).

    After installation, IDEA StatiCa automatically integrates the BIM links to your FEA programs. For later installed programs, BIM links can be activated in the BIM link installer.

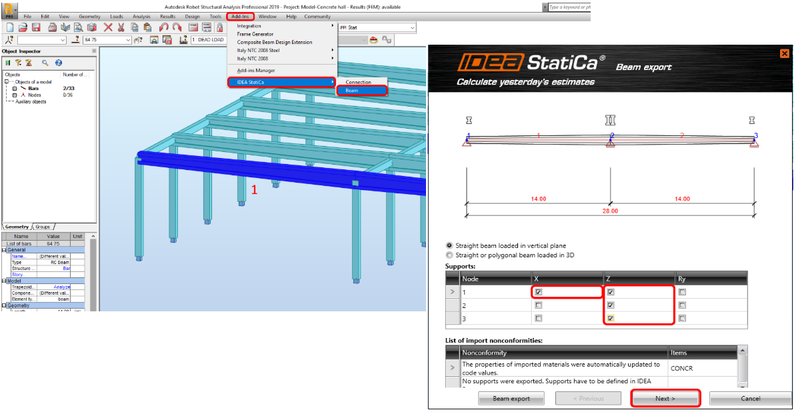
    The data transfer from most FEA Softwares to IDEA StatiCa is realized via the Code-check manager. The code-check manager is an application to import and manage structural joints and connections or members that you want to analyze and code-check in IDEA StatiCa. It also allows synchronizing the imported models after you update the source FEA project and more.

    Support center 

  12. Q How do the BIM links work for IDEA StatiCa Connection?

    A

    BIM links to the most widespread FEA and CAD programs are being developed and maintained by IDEA StatiCa and are a part of the installation setup. For any other FEA and CAD program, the BIM link can be created using the public API interface IDEA Open Model (IOM).

    After installation, IDEA StatiCa automatically integrates the BIM links to your FEA and CAD programs. For later installed programs, BIM links can be activated in the BIM link installer.

    The data transfer from FEA and CAD projects to IDEA StatiCa is realized via the Code-check manager. The code-check manager is an application to import and manage structural joints and connections that you want to analyze and code-check in IDEA StatiCa. It also allows merging imported models from CAD and FEA projects into one, synchronizing the imported models after you update the source FEA or CAD project and more.

    Support center 

  13. Q Who is behind the software and the method?

    A

    IDEA StatiCa Connection was created by a team of experienced software developers at IDEA StatiCa internal team and two technical universities.

    Meet the team.


    The CBFEM method

    The CBFEM is the core of IDEA StatiCa software. CBFEM (Component Based Finite Element Model) is a new method for design and analysis for steel connections developed by a joint effort of the IDEA StatiCa team and two university bodies—the Faculty of Civil Engineering in Prague and the Faculty of Civil Engineering of Brno University of Technology. Read more about the CBFEM method or order the verification book written by prof. Frantisek Wald and his team.

    Partners

    We build partnerships with key companies in the field and link IDEA StatiCa with their software. IDEA StatiCa is a part of a global workflow that improves productivity of structural engineers and fabricators.

    We are AEC Solution Associate of Autodesk, a recommended 3rd party solution for Autodesk users. IDEA StatiCa works with Robot Structural Analysis, Advance Steel and Revit. We partnered up with Trimble to create a seamless link between Tekla Structures and IDEA StatiCa. IDEA StatiCa has a strong synergy with Tekla Structures.

    We closely cooperate on designing and implementation of BIM links with most of the key players providing CAD and FEA software. See the full list here.

    Read more about our partnerships.

  14. Q What are the key differences between the methods CSFM and St…

    A

    What benefits does CSFM bring to the engineering practice, and why should you give it a try? One of the biggest advantages is the generality of the Compatible Stress Field Method, which enables the users to design and code-check any geometry of the concrete structure. Plus the automatic detection of the ideal reinforcement position helps with the design process and the engineer receives clear check results for both ULS and SLS including cracks and deflections.

    Watch our video recording of the webinar, where our product engineers explain the main differences between these two approaches:


    https://youtu.be/ltCcTwDa5fQ 

  15. Q Some GiD examples need to be transformed

    A
    Some GiD examples distributed vith version 3.3.0 need to be transformed to the new version. If you get an
    Error in line 2 at xxxxxxxxx.uni: system ATENA is not defined
    when opening a project, go to Data-Problem Type-Atena v3 and select again the checked type, e.g. Temperature 2D. Then choose "Transform to new problemtype" (Transform, NOT Update - the latter would destroy boundary conditions). After that the project should work normally. 
게시물 검색

그누보드5
  • 서울시 도봉구 도봉로106길 22, 201-508 (북한산현대홈시티) TEL : 02-529-0841 FAX : 02-529-0846
  • Copyright © CNG SOFTEK CO., LTD. All rights reserved.